How to deploy an Azure role from Visual Studio 2010
1. Create a security certificate
Open up Visual Studio Command Prompt.
Go to the directory where you have access to create files and wants to store the cert.
Run the following:
makecert -sky exchange -r -n "CN=<CertificateName>" -pe -a sha1 -len 2048 -ss My "<CertificateName>.cer"
You should now have a .cer file.
This cert will be used to establish a trust relationship between Azure and the VS2010 for management purposes.
2. Create the private key certificate
From the start button, find certmgr.msc.
Go to Personal > Certificates > find the certificate that you just created in the list there (it should automatically appears there).
Right click > all tasks > export
Pick ’˜Yes, Export the private key'.
You should now have a .pfx file
This private key will be used to encrypt/decrypt usernames & password such as those for RDPs.
3. Upload our certificates to Azure Portal
Go to https://windows.azure.com/
Go to Hosted Services, Storage Accounts & CDN > Management Certificates > Add Certificate and upload our .cer file.

Go to Hosted Services, Storage Accounts & CDN > Hosted Services > Certificates and upload our .pfx file.

4. Right Click on your Azure project > Publish
Pick ’˜Deploy your Windows Azure project to Windows Azure' and expand.
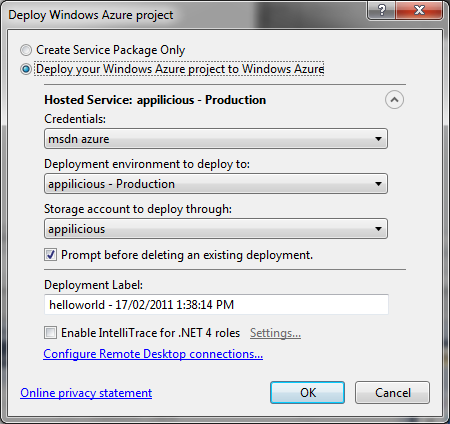
Create a new credential by picking the newly created cert from the list, and fill in the rest.

P.S. So here, apparently you're supposed to be able to create a cert. It never worked for me. It says that the cert doesn't have a private key associated to it. Bummer. Otherwise it would've been a lot easier.
Press OK.
Voila. You should now be able to publish from VS2010!
[...] An easy way to re-deploy the solution is to deploy it straight from Visual Studio 2010. It will delete the current deployment and deploy your latest version. If you don’t know how to set it up, read here. [...]
i've been able to create the *.cer from inside Visual Studio every time. also, i think you need only the Management Certificate to do a deployment, you don't need the Hosted Service certificate ... i've found i only needed the certificate on the Hosted Service for doing things like Remote Desktop connection (again creatable from inside Visual Studio)
that's odd. If I did it from VS2010 I got an error message everytime I publish the solution "cert cannot be exported" or something to the extent.